

How to Organize Charging Cables at Home and Work?
Last Updated: October 31, 2026
Quick Summary
To organize charging cables, first gather every cable you own and sort them by daily use, travel, and spares. Then match an organizer to your space, such as a divided drawer tray, desk clips, or a zippered pouch. Loose loops and labels keep them untangled.
- Pull every cable out and put them in one pile to count what you own.
- Keep one backup cable per device type and let go of the rest.
- Measure the drawer before buying a divider tray so it fits snugly.
- Wrap cables in loose loops about the size of your hand and secure them with a tie.
- Label both ends of each cable with the device name and connector type.
Table of Contents
- Why Charging Cables Get Tangled and What to Do First
- Gather and Sort Every Charging Cable You Own
- Choose a Charging Cable Organizer That Fits Your Space
- How to Keep Cables from Tangling Day to Day
- Set Up Cable Management for Your Desk
- How to Organize Cords in a Drawer, Step by Step
- Label, Maintain and Safely Retire Your Cables
- Your Next Step: Build a Charging Station This Weekend
- Frequently Asked Questions
Why Charging Cables Get Tangled and What to Do First
Charging cables tangle for a simple reason: they get tossed into bags, drawers, and bedside tables without a plan. Most people don't notice the mess until they need a cable in a hurry and find a knot instead, which is why learning to organize charging cables early saves so much frustration.
The fix starts with a short reset. Pull every cable out of the drawer, bag, and car, and put them in one pile. Seeing the full pile shows you how many cables you really have, and that count makes the next steps easier.
Here is a quick way to start:
- Unplug everything and move it to a flat surface
- Set aside anything broken, frayed, or hard to identify
- Note which device each remaining cable charges
The steps below will work with the tools you already own.
Gather and Sort Every Charging Cable You Own
Start by collecting cables from every room, your car, and your work bag. Many people are surprised to find three or four cables they forgot they owned, so this step is essential before you try to organize charging cables in any lasting way.
Sort them into simple groups:
- Daily use: the phone, laptop, and earbud cables you plug in every day
- Travel: cables you pack for trips
- Spare or unknown: cables you rarely use or can't identify
A common mistake is keeping too many spares. Keep one backup for each device type and let go of the rest.
Choose a Charging Cable Organizer That Fits Your Space
The right organizer depends on three things: where the cables live, how many you keep, and whether the setup needs to be removable. For guidance on which organizers are durable enough to last, see durable organizers. Match the organizer to the location first, then to the cable count.
Drawer organizers. Look for divided trays or adjustable dividers, since cable counts change over time. Measure the drawer's interior before buying so the tray fits snugly and doesn't slide every time the drawer opens.
Desk and edge clips. Adhesive cable clips work on many desk edges, but clean the surface first so they stick. If you can't drill or stick anything, a removable option such as a simple binder clip on the desk edge can work.
Bags and travel pouches. A zippered pouch with elastic loops keeps each cable separate and prevents the "one big knot" problem. Look for a pouch with a flat profile so it slides into a laptop sleeve, and pick one with a visible mesh side so you can see what's inside without opening it.
Bins and baskets. Open bins work for rarely used cables but invite tangling if cables aren't bundled first. Use bins only after cables are looped and tied, and label the bin by device type rather than by cable color.
Materials and durability. Cheap plastic dividers can crack at the corners after a few months of use. To judge whether an affordable organizer will hold up, see how to tell if affordable home goods will last. Fabric bins hold up better in drawers but are harder to wipe clean. For a drawer that holds daily-use cables, a rigid tray with a soft liner is the most durable combination.
Skip if: You charge everything at one fixed desk with a power strip, in that case, cable clips and ties do the job and a drawer organizer is unnecessary.
How to Keep Cables from Tangling Day to Day
Tangles form when cables are wound tightly or stuffed in a pile. Loose loops are the simplest fix.
Try these habits:
- Wrap each cable in a loose loop about the size of your hand, then secure it with a tie
- Avoid wrapping cables tightly around your fingers or the device
- Store the phone cable with the charger it belongs to, not in a random pile
Small daily habits matter more than one big cleanup. Spend two minutes putting cables away each evening and the tangles stay away.
Set Up Cable Management for Your Desk
A desk is where cables pile up fastest. Browse unique tech lifestyle accessories that help keep a workspace tidy. Start by identifying which devices need power at the desk, such as a laptop, phone, and tablet.
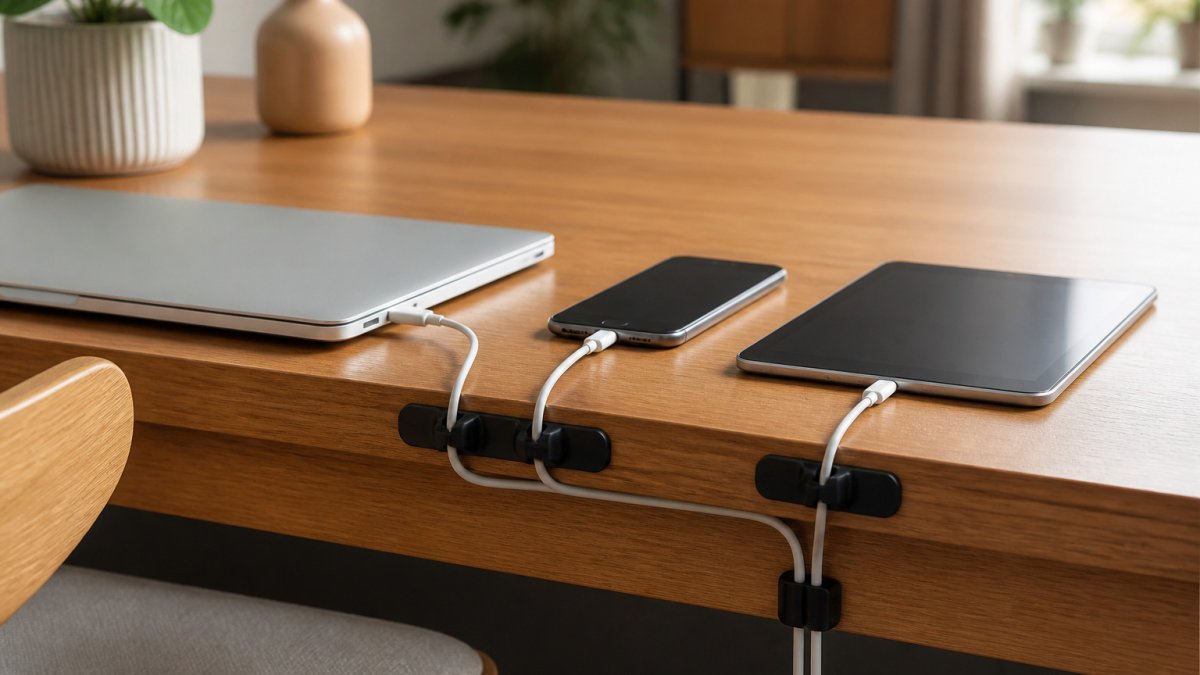
Follow these steps:
- Clip a cable holder to the edge of the desk to guide cords down and out of the way
- Bundle the cables for each device with a cable tie or Velcro strap
- Route the bundles along the back of the desk, away from your feet
- Use a small power strip with a switch so you can turn off all devices at once
Watch out: Don't run cables under rugs or across walkways. They can overheat, get pinched, or trip someone.
The article's desk steps map the setup from clipping cords to switching off power.
| Step | What to do | Note |
|---|---|---|
| Clip a cable holder | Clip it to the desk edge to guide cords down and out | Keeps cords out of the way |
| Bundle cables | Tie each device's cables with a tie or Velcro strap | Use one bundle per device |
| Route along the back | Run bundles along the back of the desk | Keep them away from your feet |
| Use a switched power strip | Turn off all devices at once | A small strip with a switch works |
How to Organize Cords in a Drawer, Step by Step
A drawer works well when each cable has its own space. Dividers or small bins keep cables from sliding into one messy heap. For more practical tips on organizing a small space, read practical home organization for small rooms.
- Empty the drawer and wipe it clean
- Place dividers or bins in the drawer and measure each section
- Sort your cables by device type, with daily-use cables near the front
- Coil each cable loosely and place it in its section
- Label each bin so you know where things belong
Best for: Small apartments and shared households with one main charging drawer. Skip if: You charge most devices at a desk with a fixed power strip.
Label, Maintain and Safely Retire Your Cables
Labels save time, but the bigger win is knowing which cables are safe to keep. This section covers labeling, a simple inspection routine, compatibility checks, and a clear process for retiring cables responsibly, the parts most organization guides skip.
Label so anyone can find the right cable. Label both ends of each cable, not just one. Use a label maker, a piece of tape, or a small tag, and write the device name and the connector type. For shared households, a consistent naming pattern (device + location) prevents the "whose cable is this" problem.
Run a quarterly inspection. Every few months, check each cable for:
- Frayed or exposed wire near the connector or along the length
- Bent, loose, or discolored connectors
- Cables that charge slowly or only work at a certain angle
- Cables that feel warm during normal charging
Replace any cable with exposed wire, a bent connector, or a warm spot. A damaged cable can overheat or stop working, and continuing to use it isn't worth the risk. Unplug chargers when not in use and avoid covering them while charging.
Check compatibility before you keep a cable. Connector types matter: USB-C, Lightning, and micro-USB are not interchangeable without an adapter. Wattage matters too, a cable rated for a phone may not safely carry the power a laptop needs. Check the cable's rating or the device's charger label, and keep a cable only if you can name the device it charges. Unknown cables are the most common source of clutter and the hardest to use later.
Retire cables responsibly. Use a simple decision process:
- Test the cable on a known device. If it works and fits a device you own, keep it as a labeled spare.
- If it works but fits nothing you own, set it aside for donation or recycling.
- If it's damaged, don't donate it, recycle it.
Many cities and electronics retailers offer drop-off recycling for cables and small electronics. Check your local waste program before putting cables in the trash, since cords and chargers often contain materials that shouldn't go to landfill.
Keep the system from rebuilding. Once a quarter, repeat the inspection and relabel anything that's worn. A five-minute check keeps the drawer from turning back into a pile.
Your Next Step: Build a Charging Station This Weekend
You don't need a big project to get organized. Pick one spot, such as a kitchen counter or a bedroom shelf, and set up a charging station with a power strip, a bin for cables, and labels.
Start with the cables you use every day, then add the rest as you go. Once your charging station is set up, use this apartment essentials checklist to plan what to add next. A single weekend of work can save you hours of searching over the next year.
Frequently Asked Questions
How do you organize charging cables?
Start by gathering every charging cable in one place and removing any that are broken or that you no longer recognize. Sort the rest by device or purpose, keeping the cables you use daily separate from those you rarely need. Store daily cables in an accessible spot such as a desk tray or charging station, and move rarely used cables into a labeled drawer divider or travel pouch. Bundling each cable with a reusable cable tie keeps every set together and makes it quicker to find the right one when you need it.
How do you keep charging cables from tangling?
Wrap each cable loosely in an over-under pattern instead of around your hand, which twists the wire. Secure the ends with a hook-and-loop strap or cable tie so the cable cannot slide into a knot. Store cables in a drawer divider or bin rather than loose in a bag, and avoid pulling them tight when you unplug. A charging cable organizer with separate slots also stops cords from crossing over each other.
What is the best way to store charging cables?
The best storage depends on where you charge. For daily use, a desk tray, charging station or wall-mounted organizer keeps cables within reach and off the floor. For cables you rarely use, store them in a labeled divided drawer or small zip pouch so they stay tangle-free. Keep cables out of direct sunlight and away from heat sources, and check periodically for cracked insulation, which is a safety risk and a reason to replace the cable.
How do you hide charging cables on a desk?
Use adhesive cable clips or a cable tray mounted under the desk to route cords out of sight. Run cables along the back edge of the desk and let the excess coil into a cable management box with a lid. A small power strip mounted beneath the desktop keeps plugs off the surface. Leave a little slack at each connection point so you do not strain the plugs when you move the device.
